Vendor payments
The Vendor payment process follows D365 standard process with one additional step: validating the journal lines to enable Eftsure verifications and ensure Payment files are generated with only valid vendors bank accounts.
Introduction
This section will walk you through the Vendor payment process - from a single invoice payment to a payment proposal - with additional checks and validations to increase payment security as well as productivity provided by integrating Eftsure into Dynamics 365 F&O.
With this extra step, Eftsure will provide real time validation during your payment process, before generating your Payment file and before approving it in the bank portal. Our improved processes will provide full confidence against manual alterations and ensuring you pay the right payee and the right account.
We recommend to keep D365 General Ledger Parameter Allow multiple transactions within one voucher turned off, to ensure each Vendor Payment transaction is associated to a single voucher. More details are available in D365 configuration pre-requisites
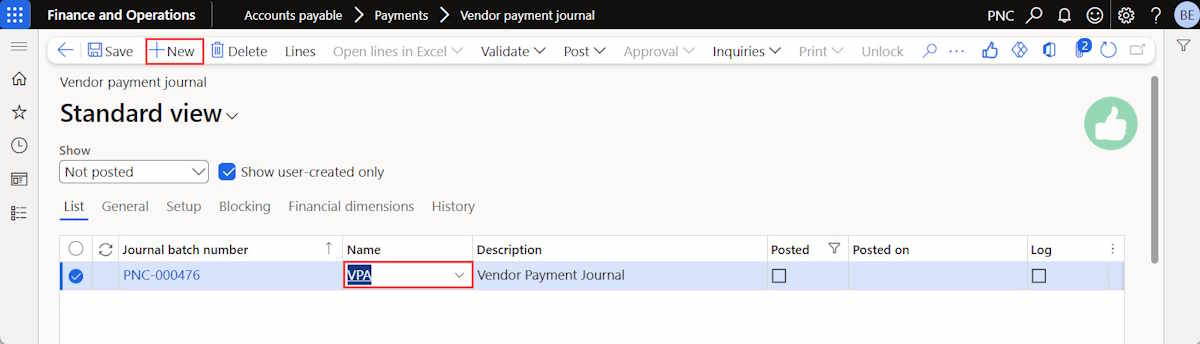
Create Vendor payment journal
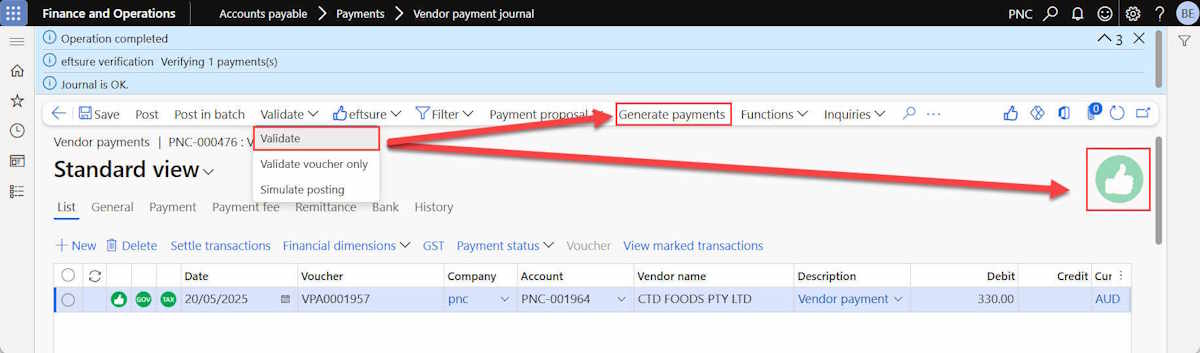
- Navigate to Accounts payable > Payments > Vendor payment journal.
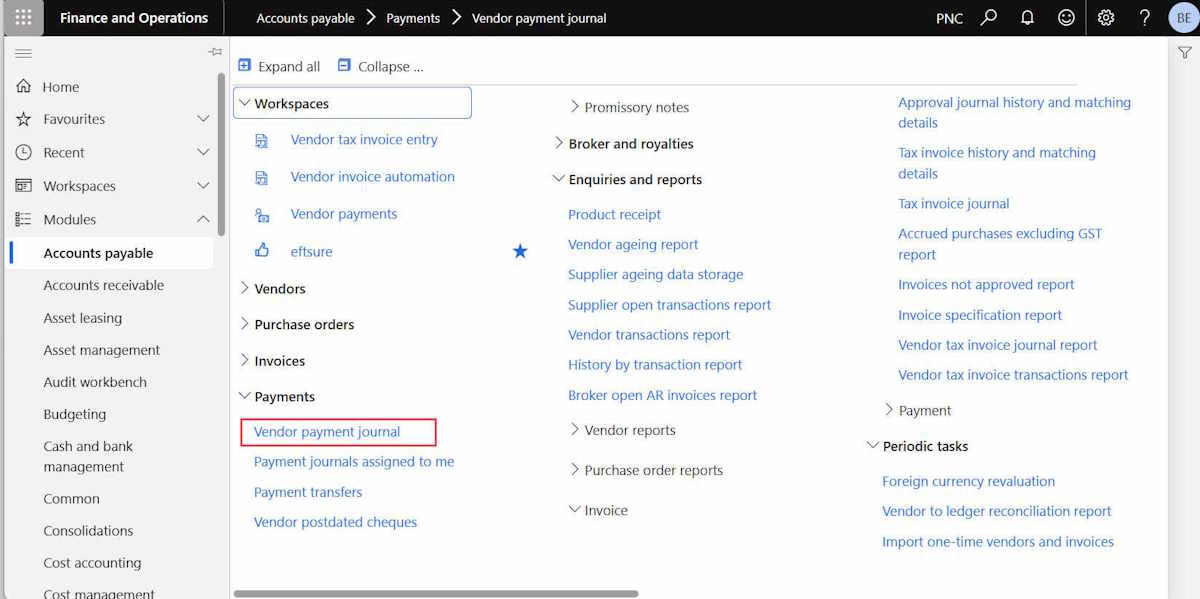
- Click New, select the Journal Name.
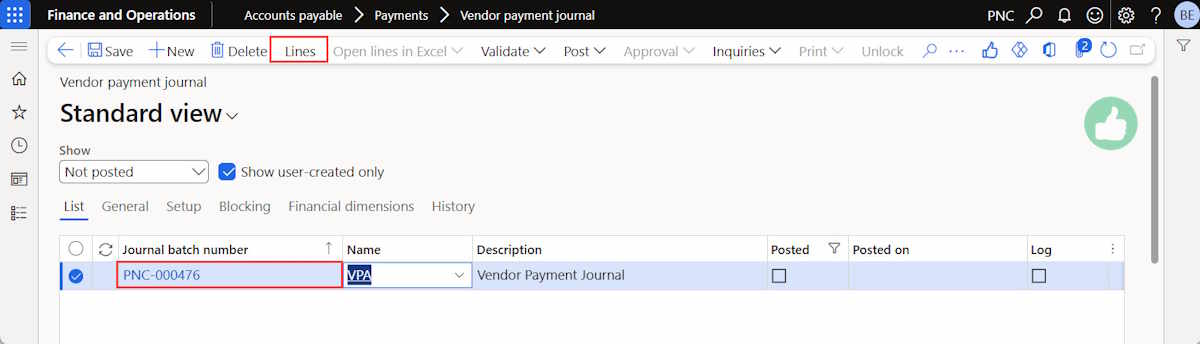
- Select Lines or click on the Journal batch number.
In the next section we will list out three standard payment methods based on business requirements.
Payment without invoice
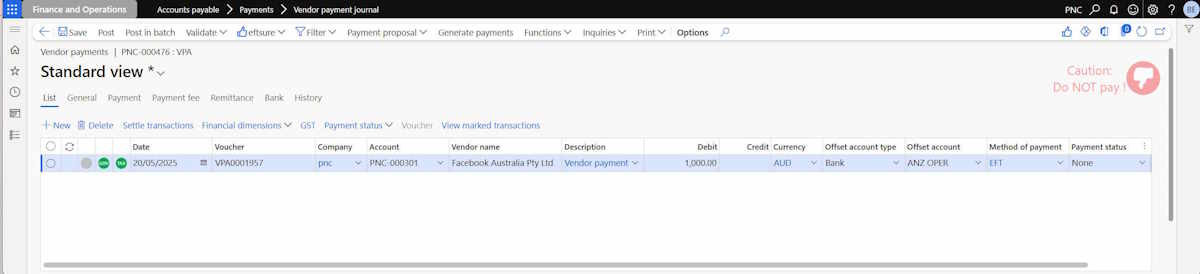
- Enter the Payment Journal Line by selecting the Vendor Account, Description and Payment amount.
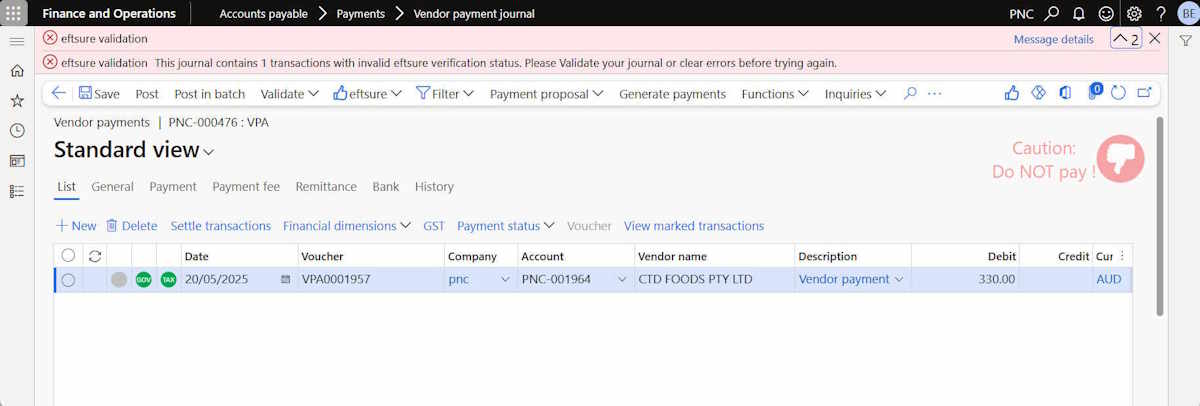
- When the Payment Line in saved, the following message is displayed to remind the user of the mandatory Eftsure step to validate the Journal.

- Click Validate > Validate
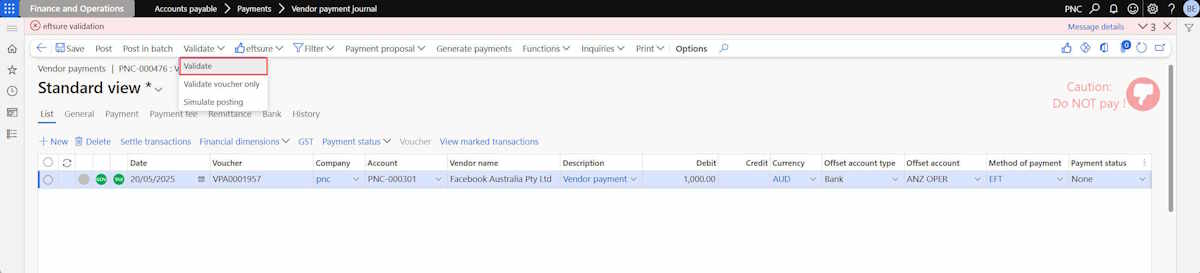
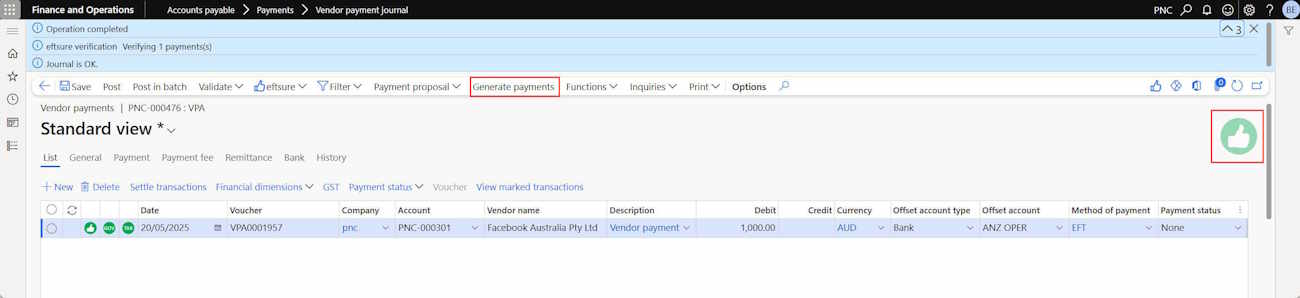
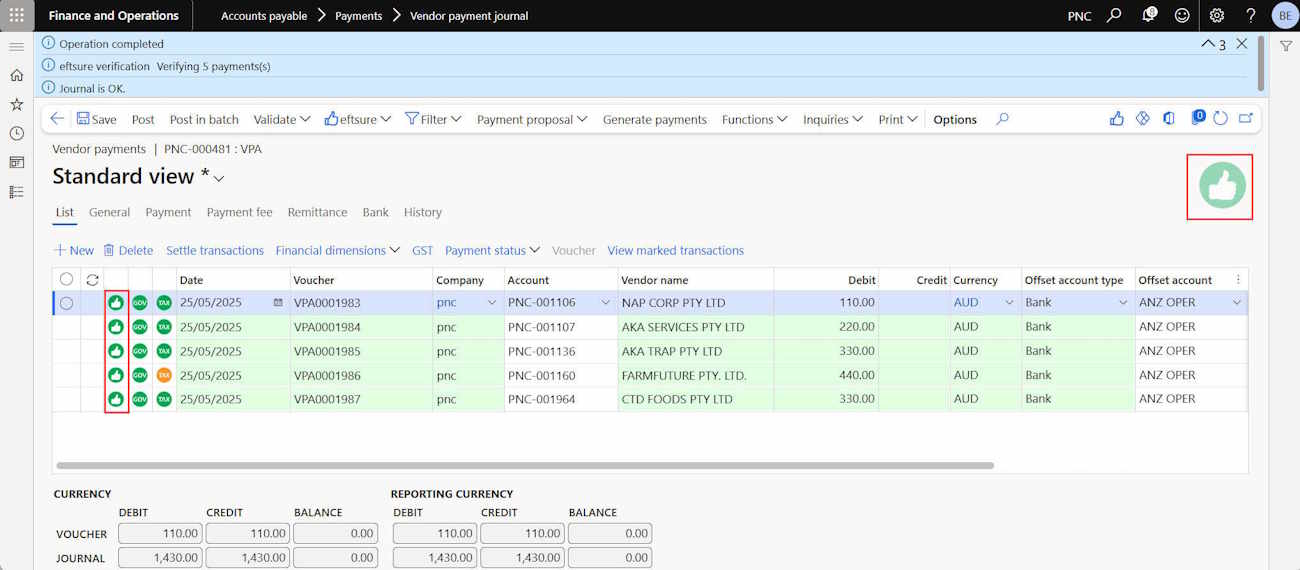
- Eftsure Payment Journal status is automatically displayed. The Button Generate Payments becomes available if the Payment Journal status is valid (i.e. if the Payment Lines contain only valid vendors bank accounts).
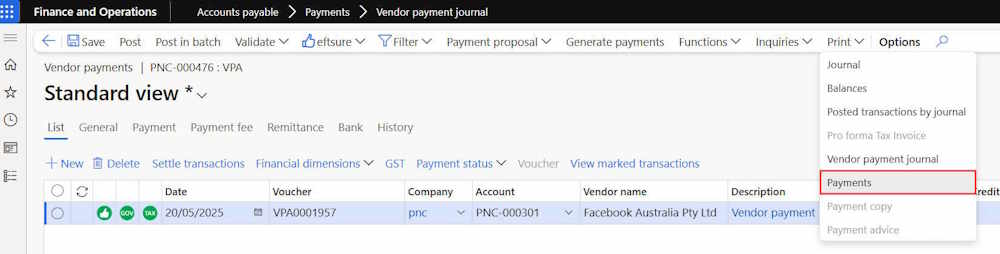
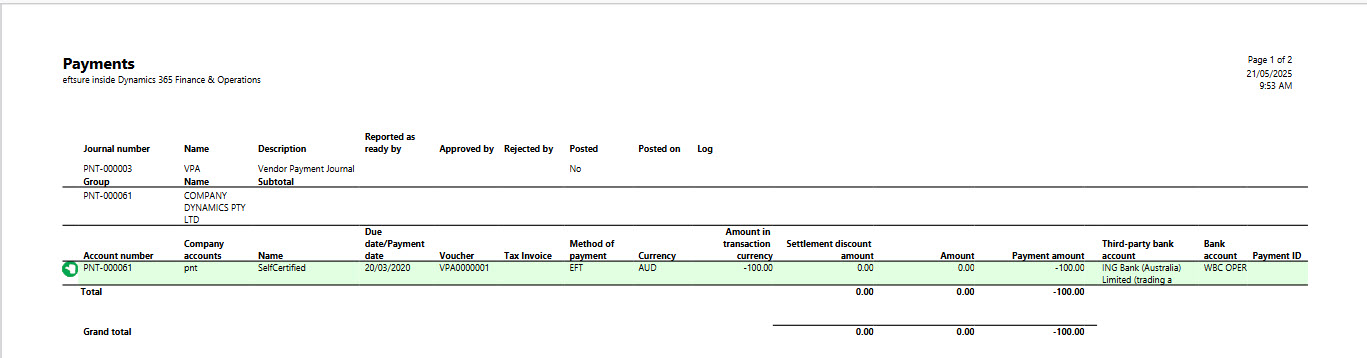
- [Optional] The user can extract payment report for review or pre-approval by selecting Print > Payments.
If the payment is without invoice, user will only need to select Payment option.
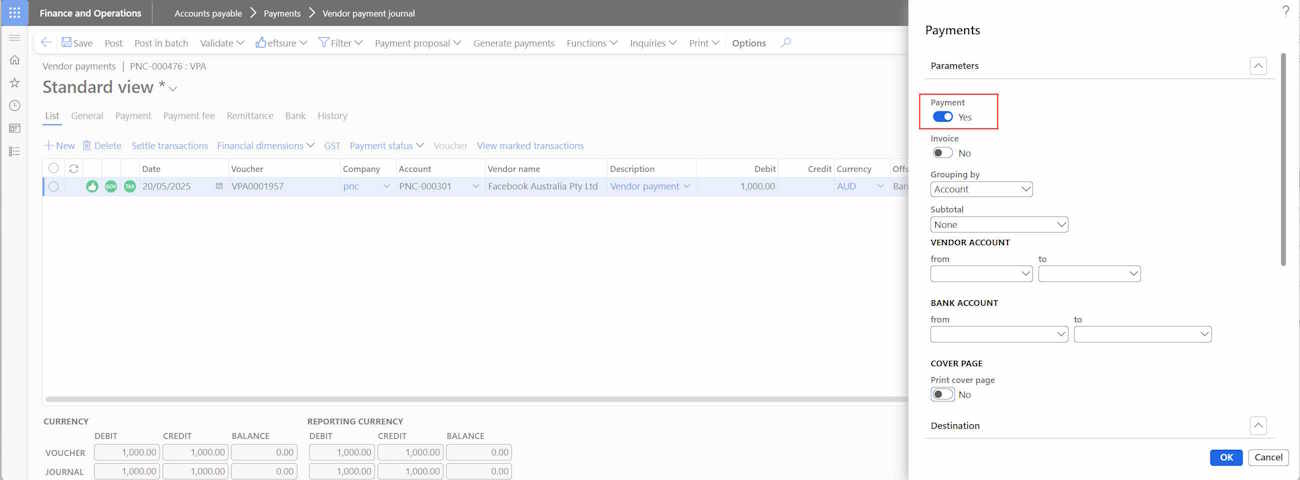
The Payment report, including Eftsure signals, can be reviewed and approved.
Once the Vendor Payment Journal has been reviewed and approved, the user can generate payment.
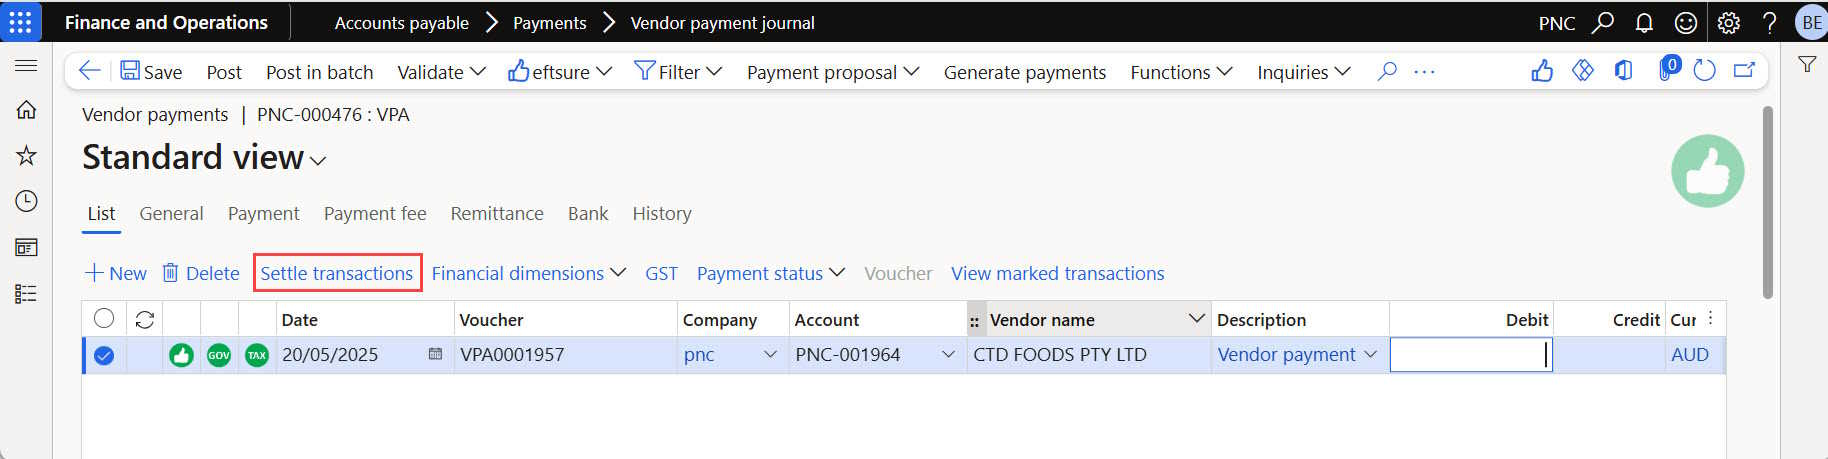
Payment via Settle transactions
-
Enter the Payment Journal Line by selecting the Vendor Account and Description.
-
Click the Button Settle transactions.
- Select correct invoice(s) for payment and Mark selected button then click OK.
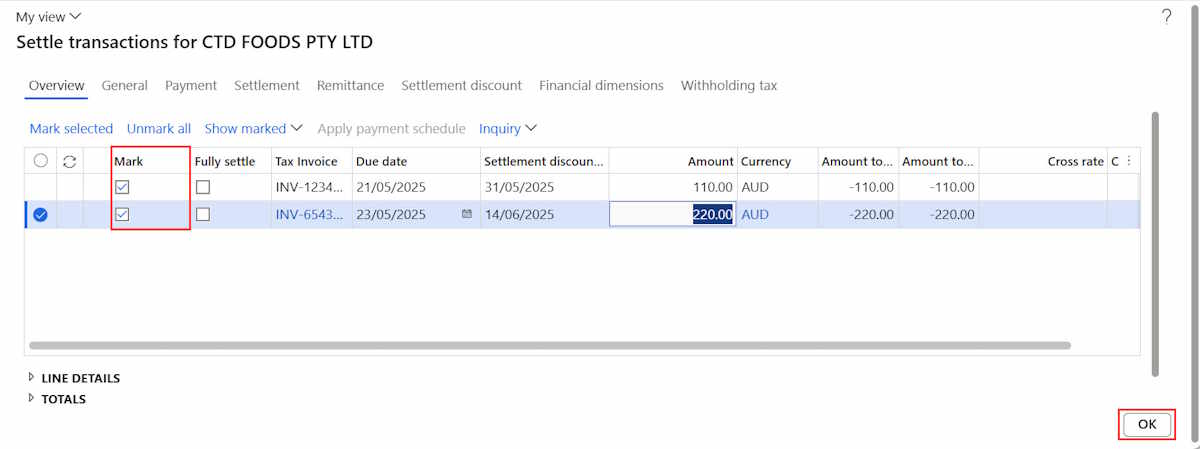
- The Payment amount corresponds to the total balance of the settled invoices. The following message is displayed to remind the user of the mandatory Eftsure step to validate the Journal.
- Click Validate > Validate. Eftsure Payment Journal status is automatically displayed. The Button Generate Payments becomes available if the Payment Journal status is valid (i.e. if the Payment Lines contain only valid vendors bank accounts).
- [Optional] The user can extract payment report for review or pre-approval by selecting Print > Payments.
Once the Vendor Payment Journal has been reviewed and approved, the user can Generate payment.
Payment with Payment proposal
This option is used to generate Payment batches -- i.e. multiple payments for multiple vendors using selected criteria.
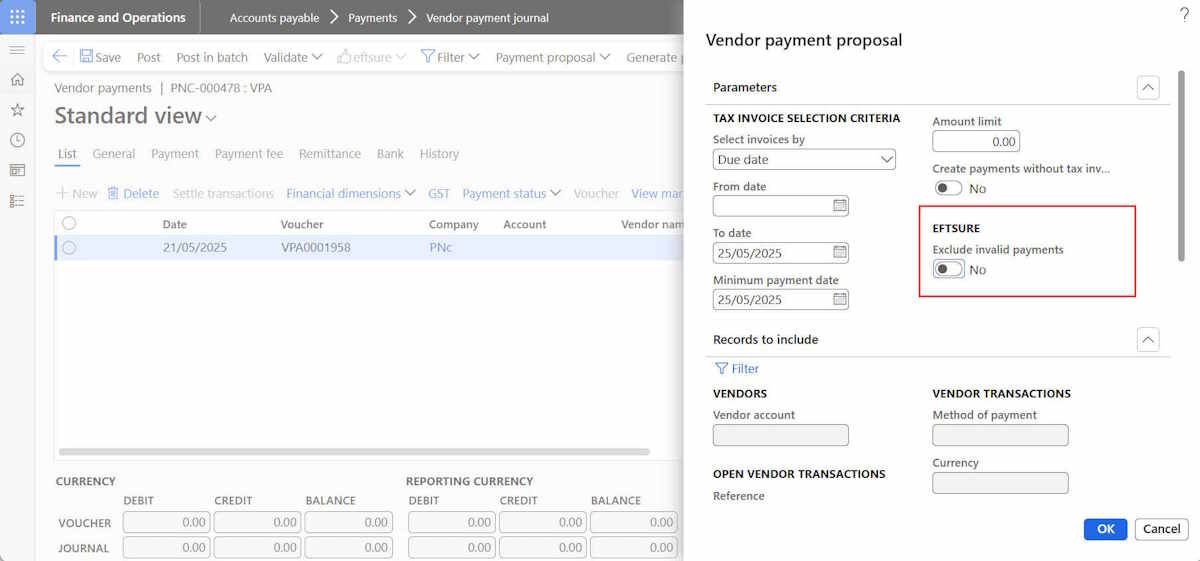
- In the Vendor Payment Journal, click Payment proposal > Create payment proposal.

- Users can generate the payment proposal by Due date or Amount limit. Click OK to create the Payment proposal.
When activated, the option Exclude invalid payments enable to select only valid transactions to pay (i.e. Verified vendors, Self-certified vendors or vendors excluded from Eftsure verification).
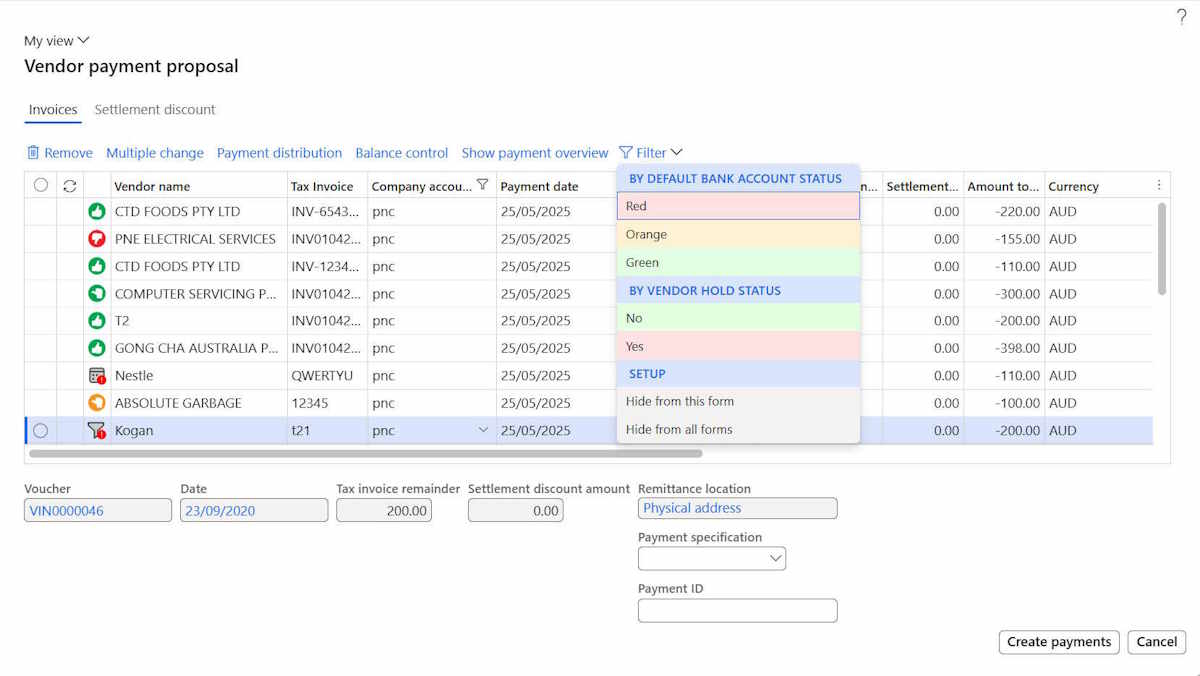
- Review the invoices to be paid and remove the ones to discard from the Payment Journal. Click Create payments to transfer the invoices in the Vendor Payment Journal.
A filter is available to select invoices using the Vendor or Bank Account verification status. This filter makes it easy to remove invoices with invalid Vendor or Bank Account from the payment proposal.
| Filter Section | Value |
|---|---|
| BY DEFAULT BANK ACCOUNT STATUS | Red: Filter Invoices associated with invalid Vendor bank account. Orange: Filter Invoices associated with unverified Vendor bank account. Green: Filter Invoices associated with valid Vendor bank account. |
| BY VENDOR HOLD STATUS | Yes: Filter Invoices for Vendor associated with Hold status (All, Payment). No: Filter Invoices for Vendor not associated with Hold status (All, Payment). |
- The following message is displayed to remind the user of the mandatory Eftsure step to validate the Journal.
- Click Validate > Validate. Eftsure Payment Journal status is automatically displayed. The Button Generate Payments becomes available if the Payment Journal status is valid (i.e. if the Payment Lines contain only valid vendors bank accounts).
- [Optional] The user can extract payment report for review or pre-approval by selecting Print > Payments.
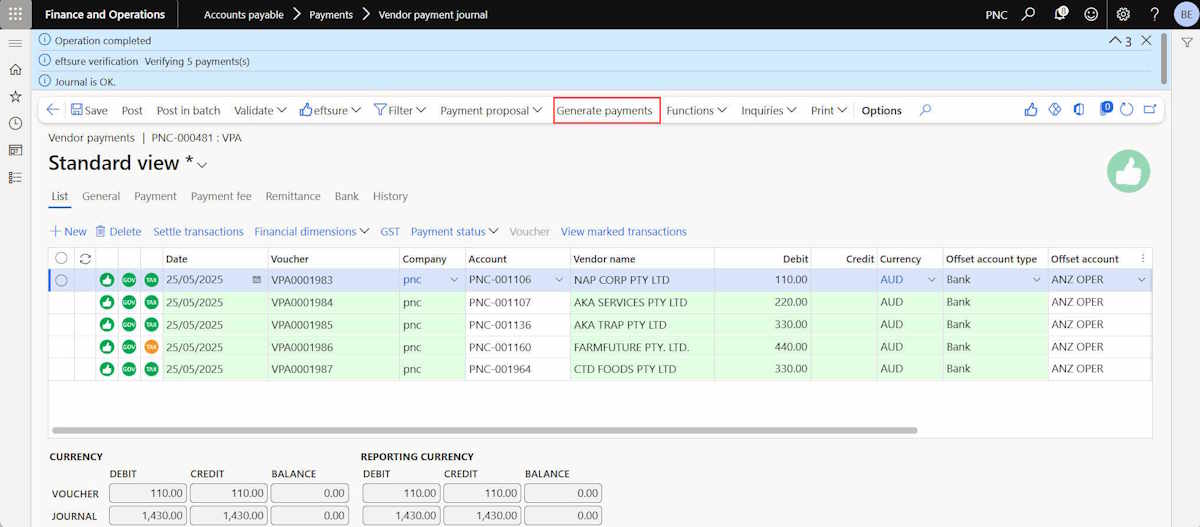
Once the Vendor Payment Journal has been reviewed and approved, the user can Generate payments.
More details about Standard D365 F&O Vendor Payment Proposals automation can be viewed in below article. Microsoft Docs | Automate vendor payment proposals.
Generate payments
Users can Generate the payment file associated to the Vendor Payment Journal once all Eftsure validation steps are completed and the Journal appears as  verified.
- In the Vendor Payment Journal, click the Button Generate Payments.
- In the Generate payments dialog box, select the relevant Method of Payment or File Format and the Company Bank Account.
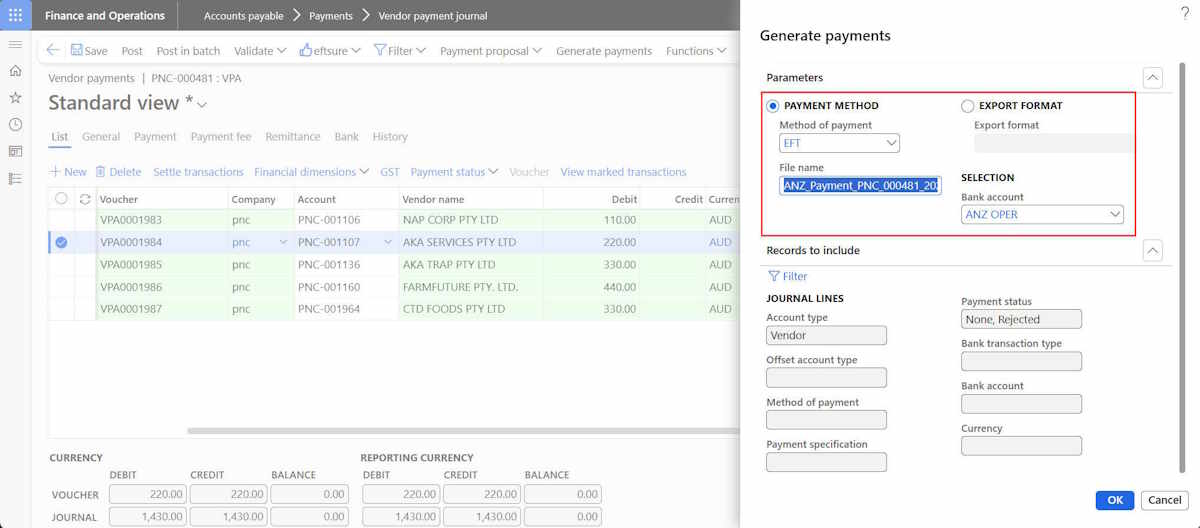
The selection criteria and prompts illustrated in this example are specific to Australia’s Methods of Payment. Selection criteria and prompts can vary depending on your company localisation in D365.
.
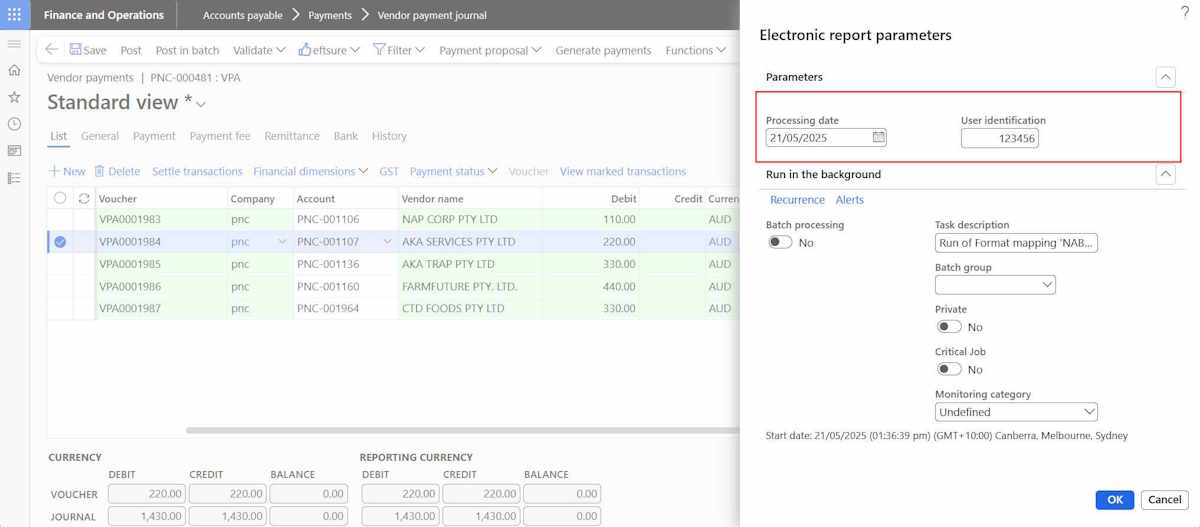
- In the Electronic report parameters dialog box, enter the relevant Processing date and User identification. Click OK.
The selection criteria and prompts illustrated in this example are specific to Australia’s ABA File Format. Selection criteria and prompts can vary depending on your company localisation in D365.
The Payment File will be successfully generated.

Once payment is generated, the payment status will be automatically changed from None to Sent.
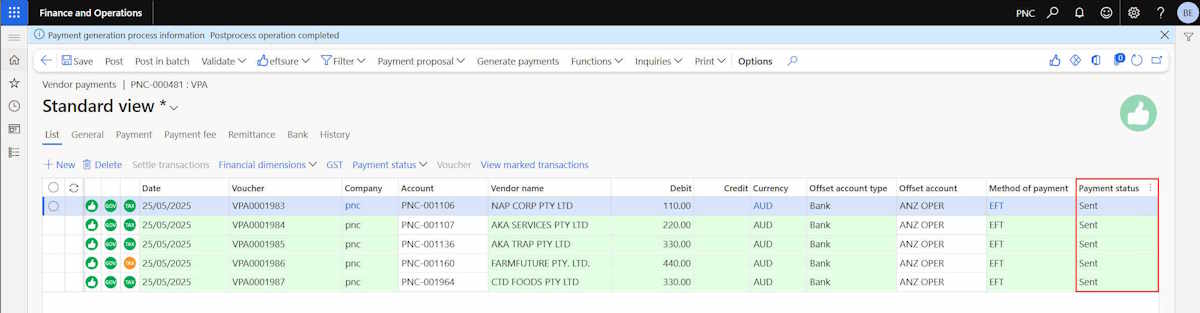
The Vendor Payment Journal is ready to be posted!
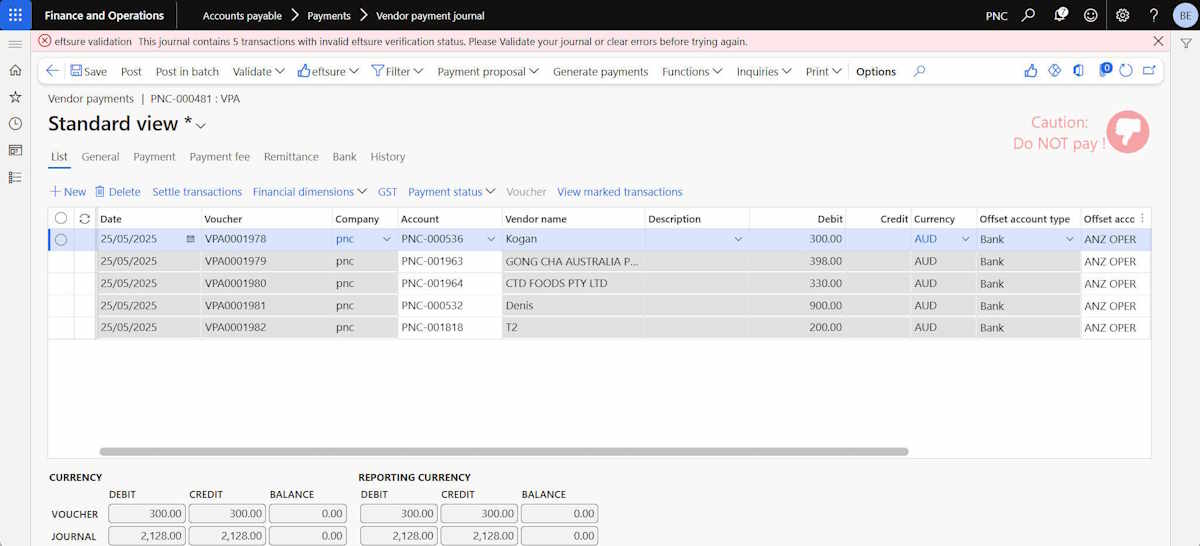
Journal with invalid payment lines – common scenarios
Excluded Vendors & Method of payment
Eftsure payment validation is not only performed by vendor bank account but also method of payment.
When a  Vendor excluded from Eftsure Verification is paid using a Method of Payment activated for Eftsure Verification, the following error message will be displayed when the user attempts to validate the Vendor Payment Journal.
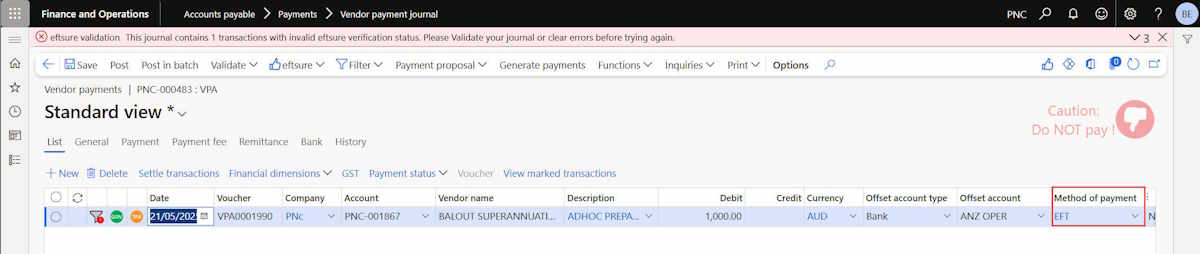
Menu Account Payable > Setup > Payments > Methods of Payment, ensure a Method of Payment is created specifically for Vendors excluded from Eftsure verification. The flag Eftsure verification must be turned off for this Method of payment.
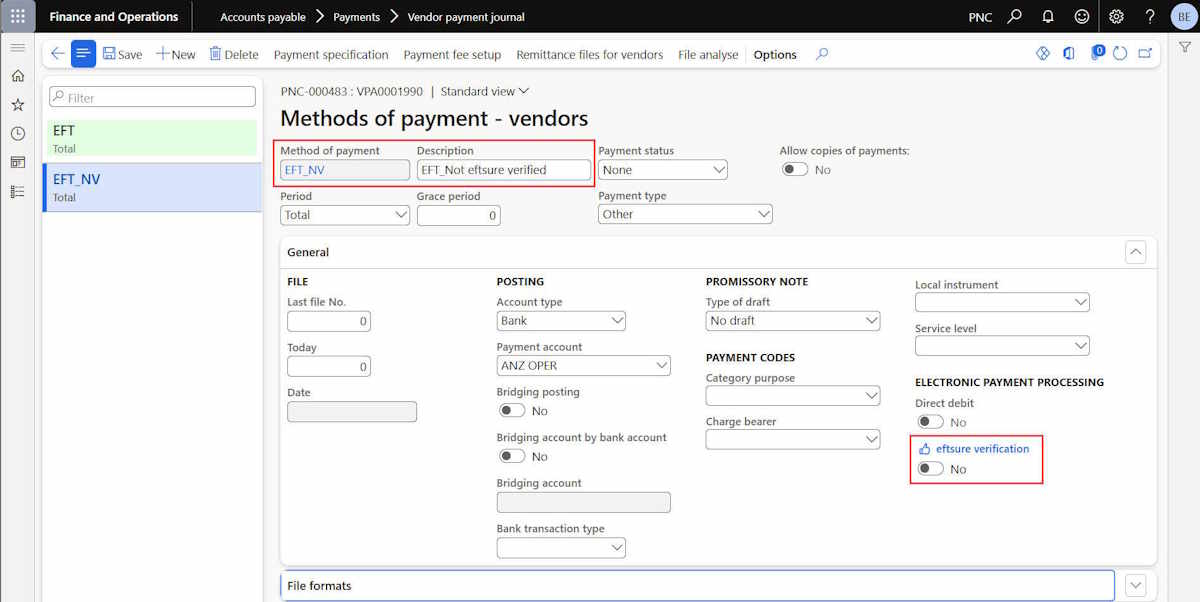
Once the Payment line is associated to the Method of payment excluded from Eftsure verification, the Vendor Payment Journal is successfully validated.
